Many of us have been snapping digital photos so long—or even scanning physical ones—that we have the equivalent of multiple giant shoeboxes of photos. With aging computers or external drives, we may be at risk of losing some older sets and want to consolidate them for access and backup.
One Macworld reader recently had her older Mac die and take years of photos with it, but she fortunately had a Time Machine backup. She wants to merge those old photos with a current set that starts where the old photos end. The solution is tricky, and will be tricky no matter what you do.
Restore or copy your media
The first order of business: restore or copy your older media if it’s not on the same drive or a drive connected to the same Mac at which you want to consolidate everything.
If you’re using Time Machine, don’t restore your iPhoto Library or Photos Library to your Home directory, because this may overwrite your newer images and libraries. Instead, follow these instructions:
-
Launch Time Machine, which is in your Applications folder. If Time Machine appears in your menu bar, select its icon and click on Enter Time Machine.
-
Navigate to your home directory’s Pictures folder.
-
Navigate back in time to the last state of your iPhoto Library or Photos Library that you want to restore from. For an older machine, it may be the very “latest” version.
-
Control-click the library file to choose Restore “Photos Library,” and then—critically!—select a destination other than where the current iPhoto or Photos Library lives.
-
Click Restore.
Now with at least two libraries, you need to figure out how to merge them.
Upgrade iPhoto Library
If one library dates back to iPhoto, you need to start by upgrading it to Photos:
-
Quit Photos if it’s running.
-
Launch Photos while holding down the Option key.
-
Click the Open Other button and select your iPhotos Library file.
-
Wait for the process to complete.
Because Photos uses a special kind of link when upgrading an iPhotos Library instead of copying the files in the library, you don’t need much additional storage to complete this process. Only new thumbnails and other support files created by Photos consume additional space.
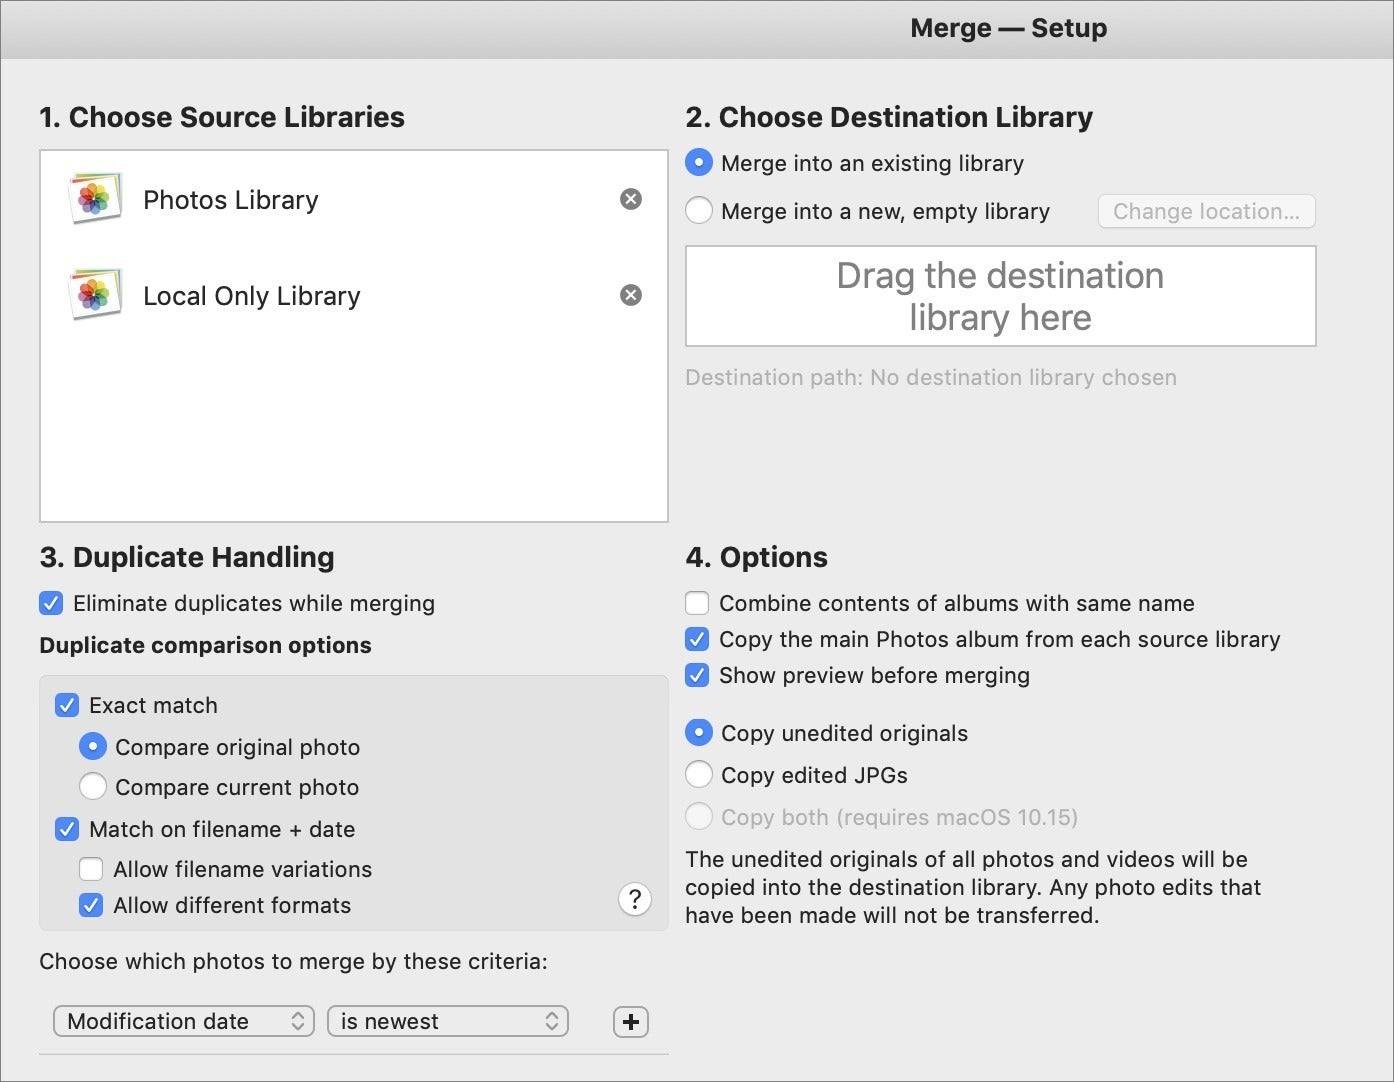
Merge with PowerPhotos
The easiest way to merge your old and new files and remove overlapping duplicates is with third-party software: PowerPhotos from Fat Cat Software ($29.95). That may be above your budget, but it’s the best tool for working with Photos libraries, and contains the merge feature not found in Apple’s app.
Choose Library > Merge Libraries, select the libraries you want to merge, and then choose a variety of options related to de-duplication. I highly recommend reading the documentation.
 IDG
IDG
PowerPhotos offers a merge features missing from Apple’s Photos.
When you’re complete, you’ll have a single Photos Library with all your media, and can determine whether you want to delete or archive the libraries you no longer need.
Merge with iCloud Photos
A second strategy requires a little more planning, but doesn’t add any cost if you’re already using iCloud Photos to sync all your images. In effect, you want to swap your current main Photos library which is synced with iCloud Photos, with your older library. iCloud Photos will merge the two libraries by uploading your older images and downloading your existing ones.
In fact, Apple specifically notes that this behavior will occur in case you don’t want it to!
If you designate a new library as the System Photo Library and then turn on iCloud Photos, the photos and videos in the new library will merge with those already in your iCloud Photos.
Warning! As always, I urge you to make sure you have a complete backup of all media before making changes in case something unpredictable happens.
Here’s how to proceed:
-
Quit Photos if running.
-
Launch Photos while holding down the Option key.
-
Select the older library.
-
In Photos > Preferences > General click Use as System Photo Library. Photos will warn you about how this will affect iCloud Photos.
-
In the iCloud preferences, check the iCloud Photos box. You can opt to either use optimized or full-resolution images.
-
Photos will now proceed to perform a two-way sync. When it’s complete, you will have a complete merged set in iCloud, on your other linked devices, and on your Mac.
The final steps involve cleaning up:
-
Your starting Photos library—even if an upgrade from iPhotos—is now your main library. That’s the one you want to preserve.
-
You can opt to archive to an external drive or fully delete your previous main library, as its contents are no longer necessary.
-
You can delete or archive an iPhoto Library that was upgraded to use in Photos without worrying about whether any files will be deleted that are needed for Photos—any files references in both places are retained within the Photos Library when you delete the iPhoto Library.
This Mac 911 article is in response to a question submitted by Macworld reader Eliza.
Ask Mac 911
We’ve compiled a list of the questions we get asked most frequently along with answers and links to columns: read our super FAQ to see if your question is covered. If not, we’re always looking for new problems to solve! Email yours to mac911@macworld.com including screen captures as appropriate, and whether you want your full name used. Not every question will be answered, we don’t reply to email, and we cannot provide direct troubleshooting advice.
"current" - Google News
June 09, 2020 at 05:20PM
https://ift.tt/3faD8IX
Tips for merging an old photo backup with your current Photos library - Macworld
"current" - Google News
https://ift.tt/3b2HZto
https://ift.tt/3c3RoCk
Bagikan Berita Ini


0 Response to "Tips for merging an old photo backup with your current Photos library - Macworld"
Post a Comment